The CS2 Trade Up contract is like a special game feature that lets players trade some of their lower-value weapon skins for a chance to get better and more valuable ones. People like using it because it’s like a little gamble – you combine some not-so-great skins and hope to get something awesome in return.
Many players use the Trade Up contract because it could help them make money. If they pick the right skins and understand how the skin market works, they can end up with more valuable skins than they started with. It’s also a way to make use of skins they don’t like and try to get the ones they want. Whether you’re a seasoned CS2 veteran or a newcomer looking to spice up your inventory, this guide will help you navigate the world of Trade Up Contracts.
Understanding Trade Up Mechanics
Trade Up Contracts in CS2 are a unique feature that allows players to exchange a set of lower-tier skins for a chance at receiving a higher-tier skin in return. The basic idea is to “trade up” your collection of less valuable skins in the hope of scoring something better. Discovering the best methods for successful and cheap CS2 trade ups can lead to impressive skin acquisitions. How do trade ups work in CS2? Here’s the mechanics:
- Select Your Desired Outcome: Decide what skin you’re aiming for and identify which collection it belongs to. This is crucial because you’ll need to use skins from the same collection in your Trade Up Contract.
- Collect Lower-Tier Skins: Gather a set of skins from the same collection that are of a lower tier or quality. These skins are your “input” for the Trade Up Contract.
- Place the Bet: Once you have the required skins, initiate a Trade Up Contract in-game. You’ll need ten skins of the same tier to try your luck. Note that the outcome is not guaranteed, and it’s a bit like a gamble.
- The Moment of Truth: Execute the Trade Up Contract, and the game will randomly select one of the skins from the higher tier to give you in return. If you’re lucky, you’ll receive the skin you desire; if not, you’ll get a random skin from the desired collection.

Trade Up Restrictions in CS2
Trade Up Contracts in CS2 are an intriguing way to possibly obtain better skins, but they come with certain restrictions and rules that players must adhere to. Here are the key trade up restrictions you need to know:
- Same Collection Requirement: To execute a Trade Up contract, all input skins must belong to the same weapon collection. This means that you cannot mix skins from different collections in a single Trade Up.
- Quality Grade: All input skins must share the same quality grade. For example, if you’re using Factory New skins for a Trade Up, all input skins must also be Factory New.
- Exterior Condition: Similar to quality grade, Trade Up contracts require that all input skins have the same exterior condition (wear level). For instance, if you’re aiming for Minimal Wear output skins, all input skins must be Minimal Wear.
- Rarity Tiers: CS2 skins come in various rarity tiers, such as Consumer Grade, Industrial Grade, Mil-Spec, Restricted, Classified, and Covert. When executing a Trade Up, the output skin will belong to the same rarity tier as the highest-tier input skin.
- StatTrak Compatibility: StatTrak skins can only be traded up with other StatTrak™ skins within the same collection. Non-StatTrak™ skins can be traded up together as long as they meet the other criteria.
- No Contraband Skins: Contraband skins, such as the Dragon Lore AWP, are excluded from Trade Up contracts and cannot be used as input skins.

Weapon Float and StatTrak Impact on Trade Ups
When engaging in Trade Up Contracts in CS2, it’s essential to understand how weapon float values and StatTrak technology can affect the outcome. Here’s a breakdown of their impact:
Weapon Float (Skin Wear): The float value of a skin, which determines its wear condition (e.g., Factory New, Minimal Wear, etc.), plays a crucial role in Trade Ups. When executing a Trade Up, it’s essential to ensure that all input skins have the same or very similar float values. Divergent float values can result in receiving skin with a different wear condition, which may not be desirable.
For example, if you’re performing a Trade Up with Field-Tested skins, using skins with varying float values might lead to some output skins being Minimal Wear while others remain Field-Tested.
StatTrak Consideration: StatTrak skins are equipped with a counter that tracks in-game kills. When StatTrak skins are used in a Trade Up, the resulting skin will also be StatTrak. Therefore, players must be aware that if they prefer non-StatTrak skins, they should not include StatTrak skins in their Trade Up contract.
For instance, including a StatTrak input skin in your Trade Up will yield a StatTrak output skin.
To maximize the effectiveness of Trade Ups and ensure that you receive the desired skin, it’s advisable to pay close attention to the float values and StatTrak™ presence of the input skins. Consistency in these factors will help you maintain control over the outcome and avoid any unwanted surprises when completing Trade Up contracts.
A Practical Example
Step 1
Open Your Inventory: Launch CS2 and click on the “Inventory” tab from the main menu.
Select the Skins: Locate the skins you want to use as input for the Trade Up Contract.

Step 2
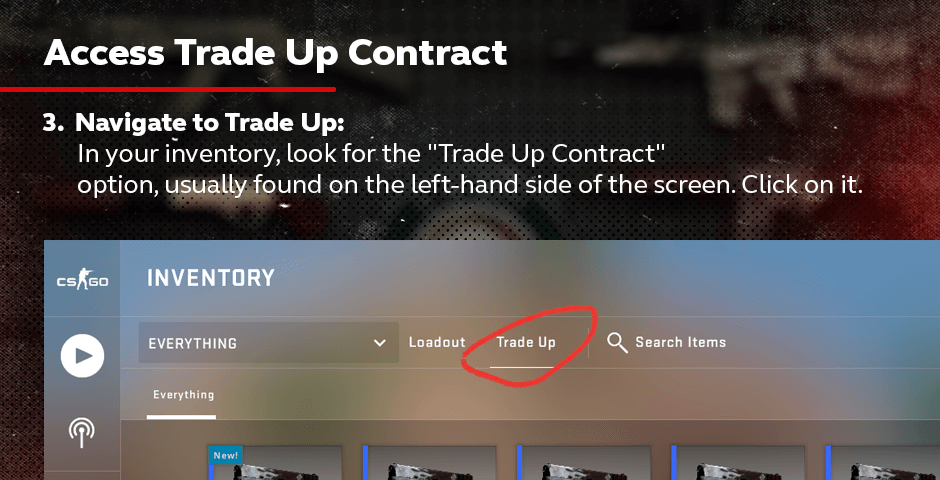
Navigate to Trade Up: In your inventory, look for the “Trade Up Contract” option, usually found on the left-hand side of the screen. Click on it.
Step 3
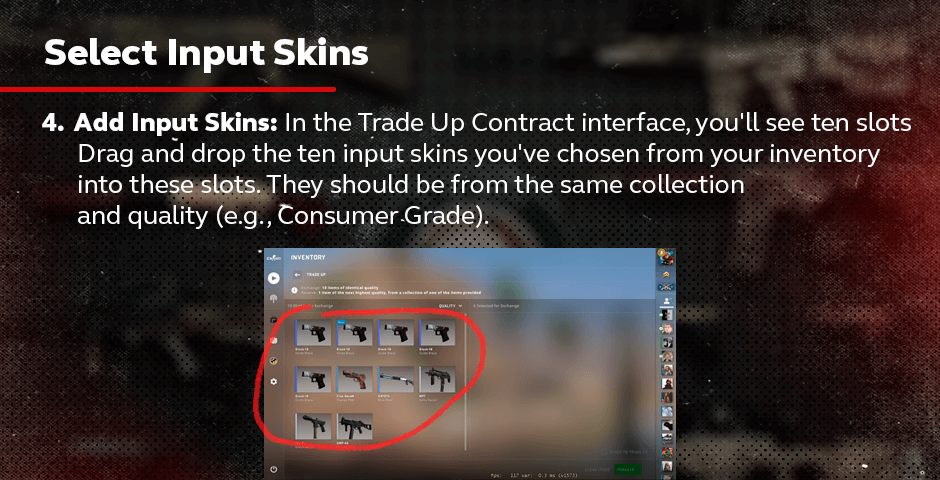
Add Input Skins: In the Trade Up Contract interface, you’ll see ten slots. Drag and drop the ten input skins you’ve chosen from your inventory into these slots. They should be from the same collection and quality (e.g., Consumer Grade).
Step 4
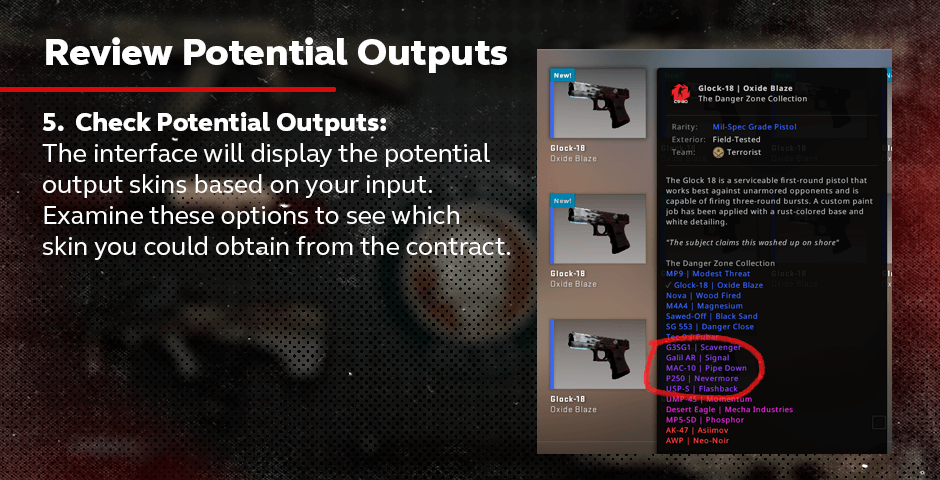
Check Potential Outputs: The interface will display the potential output skins based on your input. Examine these options to see which skin you could obtain from the contract.
Step 5
Confirm Output: If you’re satisfied with the potential output and you’ve reviewed the options, click the “Confirm Trade Up Contract” button.

Step 6
Execute the Contract: A confirmation prompt will appear, summarizing the details of the Trade Up Contract. Click the “Execute” or “Confirm” button to proceed.

Step 7
Locate the Output: After confirming, the contract will be processed. Go to your inventory to find the newly acquired output skin.

Step 8
Inspect the Output Skin: Examine the condition (float value) of the output skin. Check whether it has StatTrak technology if you included StatTrak skins in the contract.

Step 9: Enjoy Your New Skin
Use Your New Skin: Congratulations! You’ve successfully completed a Trade Up Contract in CS2. Equip and use your new skin in matches.

By following these strategies and understanding the mechanics of Trade Up Contracts, you can enhance your chances of securing CS2 best trade ups.
Mastering CS2 Trade-Up Contracts: Elevate Your Inventory with Strategic Trades
CS2 trade-up contracts offer players an exciting way to potentially obtain higher-tier skins by strategically utilizing lower-grade ones. Understanding the mechanics, restrictions, and influence of weapon float and StatTrak can greatly enhance your success in these trades. Whether you’re seeking the best trade-ups or exploring cheap CS2 trade-ups to maximize your inventory’s value, these contracts provide a thrilling dimension to the game. So, dive into the world of CS2 trade-ups, and with patience and knowledge, you can transform your collection with sought-after skins while embracing the art of trading in CS2.


![How to Get Cases in CS2: Ultimate Guide [2024]](https://front.stage.jamson-sc.dev/community/wp-content/uploads/2024/08/Main-x-Name-32.jpg)

